When You Need to Build Fast
In a forest emergency, design takes a back seat. Speed and location are everything. You’re not building a weekend cabin you’re trying to stay alive through the next storm, nightfall, or sudden drop in temperature. Prioritize quick action over clever construction. That means finding a decent spot fast and starting with what’s around you.
Some signs you need to get a shelter up immediately:
Sudden weather change: the sky goes dark, winds pick up, rain or snow starts falling.
You’re injured, weak, or losing body heat fast.
It’s getting close to sundown and you’ve got limited visibility.
In those moments, don’t waste time creating the perfect A frame with decorative touches. Get something over your head and under your back. Think emergency first, comfort later.
Here’s a quick mental checklist:
Warmth: block wind, preserve body heat.
Cover: overhead protection from precipitation and falling debris.
Visibility: if rescue is needed, stay noticeable; if stealth matters, keep it low profile.
Your best chance of staying safe is acting fast and using what nature gives you.
Choosing the Right Spot
Location makes or breaks a forest shelter. Choosing poorly can leave you wet, bitten, or worse. First, look up. Avoid trees with dead branches widowmakers especially in wind or snow. Check the ground too. Avoid low spots or dry stream beds; they flood without warning. If bugs are swarming, move. Insects love still, damp air and rotting ground don’t make a bed in it.
Next, favor terrain that works for you. A rock face can reflect heat from a fire and acts as a solid back wall. Tree lines break wind and sometimes shield from light rain. Just don’t huddle too deep in dense brush it traps moisture and limits visibility in an emergency.
Finally, think direction. Face openings away from prevailing wind. In cooler months, aim for eastern light morning sun warms fast. Heat and airflow matter more than a perfect view. When speed matters, it’s not about perfection. It’s about survival.
What to Use from the Forest
When you’re building a shelter in the woods, forget perfection. You work with what the forest gives you. But knowing the difference between deadwood and greenwood can save you time and energy.
Deadwood dry branches, fallen limbs, standing dead trees is your go to for framing and structure. It’s lighter, easier to break down, and burns if needed. Greenwood, on the other hand, is heavier and harder to snap. But it’s tough and resilient use it when you need strength or can’t find enough dead material. Try not to cut live branches if you don’t have to. It burns poorly and isn’t necessary unless you’re in a pinch.
Next, go for the insulation layer. Think like nature: leaves, pine needles, bark. Dry leaves and pine needles trap heat. Stack them thick on your roof, under your back, in crevices. Bark is your friend for waterproofing. Peel it in wide strips when the tree’s already down. Overlap it like shingles. Rain will still come, but it’ll run off better than it soaks through.
At the end of the day, don’t waste your time fantasizing about gear or gear you didn’t pack. Look down. Look around. Shelter is less about tools and more about resourcefulness. If you’re not too picky, the forest actually gives you more than you think.
Simple but Effective Designs
When time and materials are limited, keep your shelter basic. These three designs are simple, proven, and built for real world conditions.
Lean to
The lean to is survival 101: fast, reliable, and great for beginners. You just need a sturdy support like a fallen log or a strong branch between two trees and a pile of long sticks to lean against it. Add a thick layer of leaves or pine needles for insulation and rain deflection, and you’ve got shelter in under an hour. Wind at your back, open side facing your fire.
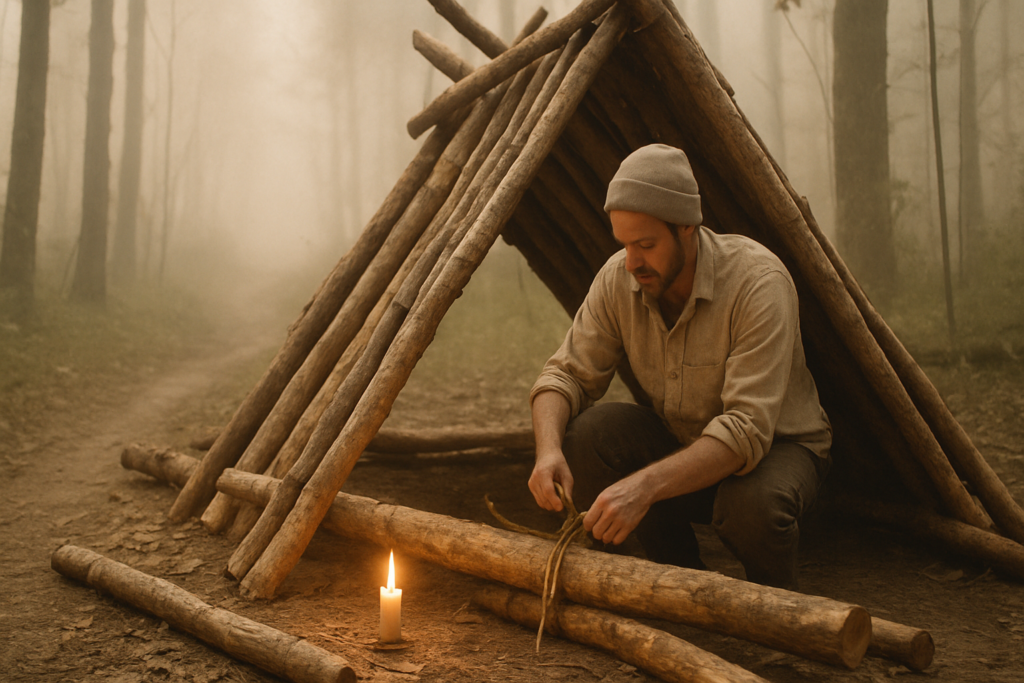
A frame
If you’ve got a little more time or stronger weather is rolling in, go A frame. Two angled walls give you better runoff for rain and snow. The design holds heat better too, especially if you pack the sides with debris. It takes more branches to build but pays off in warmth and durability. Ideal for overnight stays in wet or cold climates.
Debris Hut
When stealth or insulation is the top priority, go for a debris hut. It’s low to the ground, packed tight, and often indistinguishable from the forest floor. Use a short ridge pole, build a frame around it, and bury the whole thing in leaves, grass, or pine straw. It’s not roomy it’s just enough space to curl up and survive the night. Great option if hypothermia is a bigger threat than discomfort.
Choose what fits the situation. There’s no blueprint there’s just what works with what you’ve got.
Stay dry natural drainage and roof angle are key
Water is the enemy of warmth. A shelter that lets in rain or traps moisture turns from haven to hazard fast. Start by paying attention to the ground. Don’t build in a dip or hollow where water will collect. Look for slightly elevated spots with natural drainage. If unsure, test with a bottle of water pour and watch where it flows.
Next, angle your roof. Flat means flooded. Slope matters. Even a simple lean to or A frame must guide water away from the interior. Stack or weave roofing materials branches, bark, a thick layer of leaves so they overlap like shingles, always with the top covering the layer beneath. Think gravity: water runs down; give it a clean exit route that doesn’t include your sleeping area.
If you have a tarp or emergency blanket, that’s your outer layer. But even without it, forest debris can shed water if you layer smart and build with purpose. Wet equals cold. Stay dry and you’re halfway to surviving the night.
Reinforcing with Survival Tools
Sometimes the forest gives you just enough. Other times, the right tool makes all the difference. That knife in your essential survival gear kit? It turns scraggly branches into clean joints. A length of paracord tightens your ridgepole in under a minute. And even a cheap tarp can instantly waterproof a frame that would’ve taken hours to insulate with leaves.
Fire makes your shelter more than a structure it makes it livable. Keep your fire starting tools dry and ready. Ferro rods, drenched lighters, char cloth they’re your ticket to warmth, dry clothes, and a psychological edge. Where you place the fire matters too. Downwind of the shelter, close enough for heat but far enough for safety. Reflective walls can bounce warmth back in. The colder it gets, the more this all matters.
Then there’s brute efficiency. A compact axe or folding saw does the work of ten busted boughs and guesswork hacks. Clearing deadwood, shaping structure pieces, trimming insulation it’s about saving time and energy when both are running low. Muscle smart, not hard. Tools aren’t luxury they’re leverage.
Final Tips to Stay Safe & Efficient
Before you call it a night, stress test everything. Push against your frame. Shake the walls. Lie inside and move around. A collapsed shelter at 2 a.m. isn’t just annoying it can be dangerous. Stability matters more than perfect aesthetics.
If you’re in a true emergency or need to keep a low profile, skip the fancy build. Go compact, natural looking, and quiet. Use local materials to blend in. No ridgelines waving like a flag. No reflective gear catching moonlight.
The time to learn shelter skills is not when your fingers are shaking from cold or your headlamp’s dying. Practice when conditions are easy sunny backyard, a weekend hike, even your living room. Familiarity breeds speed.
Lastly, always keep core survival gear with you. A small tarp and paracord can mean the difference between dry and drenched. A decent knife saves hours. For a full list of essentials, check out essential survival gear. Read it before you need it. Pack it like your life depends on it because sometimes, it does.
 Lead Forest Survival Specialist & Outdoor Educator
Timothy Peters is Whisper Forest Ways’ resident expert on wilderness survival and all things related to thriving in the outdoors. With a background in environmental sciences and over a decade of hands-on survival training, Timothy combines scientific knowledge with practical experience to teach readers essential survival skills, such as shelter building, fire making, and foraging. His approach emphasizes respect for the natural world and sustainability, ensuring that all of his methods encourage low-impact interaction with the environment. Whether you’re new to outdoor adventures or a seasoned explorer, Timothy’s detailed guides and insights provide invaluable knowledge for safely and confidently navigating the wild.
Lead Forest Survival Specialist & Outdoor Educator
Timothy Peters is Whisper Forest Ways’ resident expert on wilderness survival and all things related to thriving in the outdoors. With a background in environmental sciences and over a decade of hands-on survival training, Timothy combines scientific knowledge with practical experience to teach readers essential survival skills, such as shelter building, fire making, and foraging. His approach emphasizes respect for the natural world and sustainability, ensuring that all of his methods encourage low-impact interaction with the environment. Whether you’re new to outdoor adventures or a seasoned explorer, Timothy’s detailed guides and insights provide invaluable knowledge for safely and confidently navigating the wild.