Importance Of Water Purification In The Forest
Purifying water in the forest is crucial for maintaining health. Ingesting contaminated water can lead to serious illnesses, including giardiasis, dysentery, and cholera. These diseases can debilitate hikers, making it difficult to navigate or signal for help. Even seemingly clean water can harbor microorganisms like bacteria, viruses, and parasites invisible to the naked eye.
In the forest, clean water sources are unpredictable. Streams, lakes, and rivers can appear pristine but still harbor pathogens due to animal activity, decaying organic matter, or human contamination. Even remote areas aren’t immune to pollutants that natural filtration can’t remove. Thus, proactive measures reduce health risks and ensure a steady water supply.
Carrying equipment for water purification enhances safety. Portable water filters, purification tablets, and boiling methods provide reliable access to clean drinking water. These tools are lightweight and easy to use, making them ideal for all outdoor enthusiasts. Regularly checking and maintaining this equipment ensures effectiveness during critical times.
Knowledge of water purification techniques increases self-reliance. It empowers hikers to utilize available resources efficiently, promoting a safer and more enjoyable forest adventure. Understanding various methods like chemical treatment, UV purification, and filtration adapts to different scenarios, such as stagnant or fast-flowing water.
Assessing Water Sources
Ensuring water safety in the forest starts with proper assessment. I focus on two critical aspects: identifying safe sources and recognizing contaminated water.
Identifying Safe Sources
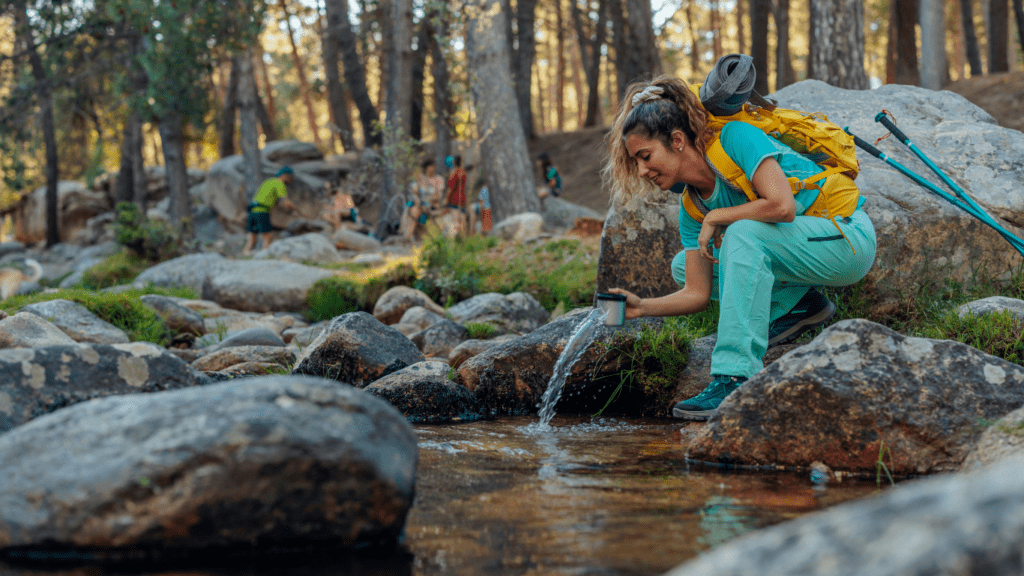
Finding safe water sources in the forest requires a keen eye. I always look for running water from springs, streams, and rivers since moving water is less likely to harbor pathogens. Springs, which emerge directly from the ground, often provide the cleanest water. Streams flowing directly from springs offer another good option.
In higher altitudes, water sources are typically cleaner. If I spot animal tracks leading to water, I proceed with caution; animals can contaminate these sources. I also avoid areas near campsites, trails, and livestock grazing areas since these can introduce pollutants.
Recognizing Contaminated Water


Recognizing contaminated water saves me from potential health risks. I avoid stagnant water since it often supports harmful bacteria. Ponds and slow-flowing sections of rivers and lakes can be a breeding ground for pathogens.
Water with visible signs of pollution, such as discoloration, foam, or an unusual smell, is a clear red flag. I steer clear of water with floating debris or algae blooms, as these suggest contamination. By keeping these indicators in mind, I reduce my risk of consuming unsafe water.
By diligently assessing water sources, I enhance my outdoor experience while safeguarding my health.
Simple Purification Techniques
Purifying water in the forest is essential for health and safety. Let’s explore straightforward methods to ensure safe drinking water.
Boiling Water
Boiling is the most effective water purification method. I’ll bring water to a rolling boil for at least one minute; at higher altitudes above 6,562 feet (2,000 meters), I extend this to three minutes. Boiling kills bacteria, viruses, and protozoa. This method doesn’t require special equipment, just a heat source and a container. I’ll let the water cool before drinking.
Using Purification Tablets
Purification tablets are compact and easy to use. Chlorine dioxide and iodine tablets are common. I’ll follow the instructions on the package, typically adding one or two tablets depending on water volume and waiting 30 minutes to four hours. These tablets can eliminate most microorganisms. I’ll note that some people might find the taste unpleasant, so adding a flavored drink mix can help.
Solar Disinfection
Also known as SODIS, solar disinfection uses sunlight to purify water. I’ll fill a transparent plastic bottle and expose it to direct sunlight for at least six hours. If partly cloudy, I’ll extend this to two days. UV rays from the sun deactivate bacteria, viruses, and protozoa, making the water safe to drink. This method works best with clear water, so I’ll filter out large particulates first.
Purifying water using these techniques ensures a safe and enjoyable outdoor experience.
DIY Water Filters
Creating a DIY water filter in the forest can be a lifesaver. It provides an added layer of purification to ensure water is safe to drink.
Basic Filter Design
A basic DIY water filter uses layers to remove impurities. This method mimics natural filtration processes found in soil and sediments. The simplest design involves creating a cylinder with multiple layers, each serving a distinct purpose: gravel, sand, and activated charcoal.
Materials Required
Gathering the correct materials is essential for building an effective DIY water filter. The primary materials are:
- Plastic Bottle (to hold the filter layers)
- Gravel (to remove large particles)
- Sand (to filter finer particles)
- Activated Charcoal (to absorb contaminants)
- Cloth or Coffee Filter (to prevent the escape of fine materials)
Each material contributes to the overall filtration process.
Step-by-Step Guide
Follow these steps to build a DIY water filter:
- Prepare the Bottle: Cut the bottom off a plastic bottle to create an open cylinder. Ensure the top remains intact for pouring water.
- Insert Cloth Layer: Place a piece of cloth or coffee filter at the bottle’s mouth to prevent materials from falling through.
- Add Gravel Layer: Add a layer of gravel, about 2-3 inches thick, at the bottom. This layer catches large debris.
- Add Sand Layer: Pour a layer of sand on top of the gravel, also around 2-3 inches. The sand filters out smaller particles.
- Add Activated Charcoal Layer: Place a 2-inch layer of activated charcoal above the sand. Charcoal absorbs harmful chemicals and pollutants.
- Add Another Cloth Layer: Finish with another piece of cloth or coffee filter to keep all materials in place.
- Filter Water: Pour the collected water through the top of the filter. Allow it to pass through each layer before collecting it at the bottom.
By utilizing these steps, hikers can effectively filter water, reducing the risk of waterborne illnesses while enjoying the forest.
Utilizing Natural Methods
Natural methods offer viable alternatives for purifying water in the forest when traditional equipment is unavailable. These methods harness the environment’s resources.
Using UV From Sunlight
To utilize UV from sunlight, I place clear plastic bottles filled with water in direct sunlight for at least six hours. The UV rays effectively kill many pathogens. This method, known as Solar Water Disinfection (SODIS), works best with clear water, as cloudy water reduces UV penetration. If the skies are overcast, I extend the exposure time to 48 hours. This method is convenient but requires patience and consistent sunlight.
Plants With Purifying Properties
Certain plants possess natural water-purifying properties. Among these, Moringa oleifera seeds stand out. I crush the seeds into a paste and mix them with the water. The seeds act as coagulants, clumping impurities together which then settle to the bottom. Another plant I use is the xylem from pine trees. It acts as a natural filter when I pass water through it, removing bacteria. These plants aren’t always readily available but are effective when found.
Essential Gear For Water Purification
When venturing into the forest, carrying the right gear ensures you always have access to clean drinking water. Here are some of the must-have items for water purification.
Portable Filters
Portable filters are crucial for on-the-go water purification. These filters, like the Sawyer Squeeze or LifeStraw, effectively remove bacteria, protozoa, and particulate matter. I always include one in my backpack because they’re lightweight and simple to use. Insert the filter directly into a water source, or attach it to a water bottle for convenient drinking.
UV Water Purifiers
UV water purifiers use ultraviolet light to neutralize harmful microorganisms. Devices like the SteriPEN are popular choices among hikers. I prefer UV purifiers when I’m certain the water source is clear, as sediment can interfere with UV light. Activate the device and stir it in the water for about 90 seconds. This method is chemical-free and leaves no aftertaste.
Emergency Kits
Emergency kits should contain essential items such as water purification tablets and small portable filters. I carry chlorine dioxide tablets in my kit as they’re effective against bacteria, viruses, and cysts. These tablets take longer to purify water (up to 4 hours), making them ideal for emergency situations. Including a multi-tool and a small container for collecting water adds versatility to your kit.